
Level Generator – Part II

In the previous article, we described the “default” parameter of each level we are going to create with the level generator.
A level is populated with various pieces we call “Level Element”
Level Element have been defined in the following list, each of the type has its own particularity and purpose in the level creation:
To make things easier, we decided to have a virtual 2D array of various size to manage the placement of our Level Elements.
Each of our Level Element will take a certain size in the 2D grid. We first wanted to place each Level Elements according to their Bounding Box, but it ends up that using a 3D grid was pretty much exactly the same in the end.
We then define what the important parameters our Level Element will have are.
The easiest and most effective way to create our level generator is to use a 2D grid. This grid will ease the placement of each element in the level, but may be problematic since element in a grid are quads – we pretty much want to manage any kind of shape for our Level Elements. To fix that problem, our Element will not use the size of their actual BBox in the grid, but a virtual value given in their parameter file. Again, we could fix that problem by using oriented bounding boxes, but the result will be the same and managing a 2D grid is much simpler
Before explaining how our path are generated, we will explain how an Element is placed in the level and how we connect Element to each other.
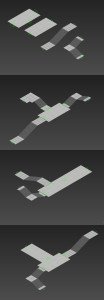
The base geometry of our Level Element is the ground. On each geometry, we add several dummies (called Helper in CryEngine) in order to mark entrance and exit points. This is done in 3DStudio, because we want the modeler to control the placement of the dummies.
According to the position and the orientation of the helpers, we will connect an Element with another one. The following picture shows various example of Level Element placement (Basic Geometries)
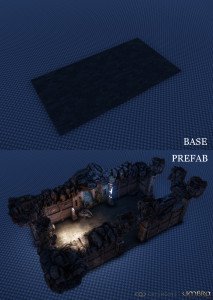
As described before, prefab are an important feature of our Level Generator.
The idea is to create a simple ground first in order to assemble all our Level Elements, and then create all the component entity. The following picture shows a basic ground on the right, and a Prefab associated to it on the left. For obvious reasons, we first create the shape of the level only with basic geometry, then add prefabs.
Also, since we manage any kind of entity in our Prefab, we can also use random content generator inside the prefab, in order to get even more variety – That’s the way we also create furniture in the rooms, but that specific part will be described later.
That’s it for today. I wanted to describe the generation process in this article, but it would result in a quite long article, so we will reveal it in our next post!
Replies: 0
Created: 9 years, 4 months ago
Category: Announcements